
Table of Contents
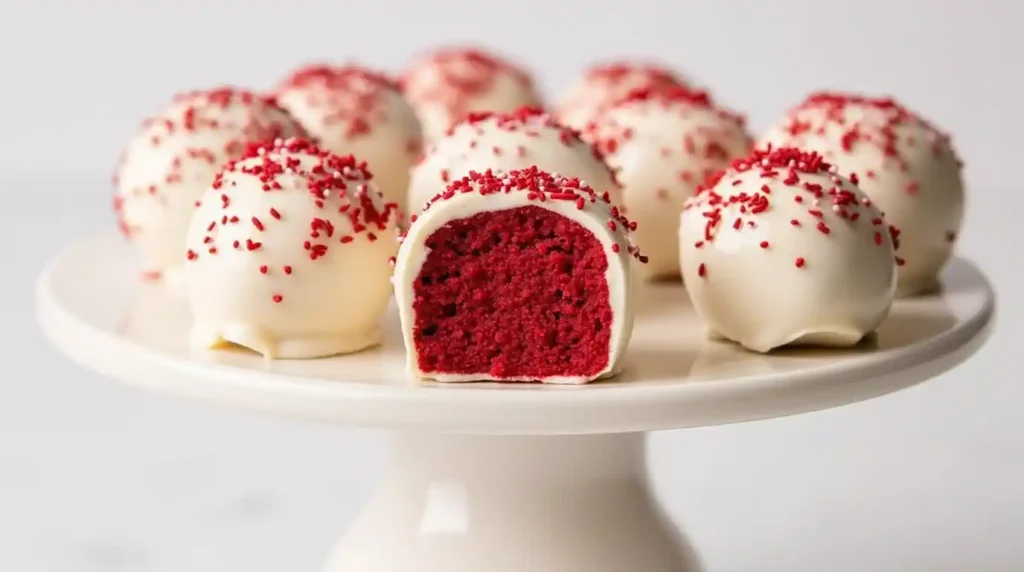
Imagine bite-sized treats that combine the rich, velvety flavor of red velvet cake with the playful charm of a lollipop. Red velvet cake pops are the party snack that’s equal parts elegant and fun—perfect for birthdays, weddings, or even a cozy night in. Did you know red velvet cake dates back to the Victorian era? Its iconic crimson hue (originally from cocoa’s reaction with acidic ingredients) made it a luxury reserved for special occasions. Today, these cake pops bring that same decadence to your kitchen in just 5 foolproof steps!
Unlike fussy desserts that demand hours of work, these pops are a breeze to make. Think of them as the chic cousin of my Classic Vanilla Cupcakes—equally crowd-pleasing but with a dramatic flair. Whether you’re a baking newbie or a seasoned pro, this recipe guarantees moist, creamy, and Instagram-worthy results. Ready to turn heads at your next gathering? Let’s dive in!
What Are Red Velvet Cake Pops?
Why red velvet? Is it because they’re as smooth as silk or because they vanish faster than a magician’s rabbit? (Spoiler: Both.) The name “velvet” comes from the cake’s tender crumb, a texture so luxurious it’ll make you forget store-bought desserts ever existed. And let’s be real: Sticking cake on a stick is pure genius. Who decided cake needed utensils anyway?
Legend says the phrase “the way to a man’s heart is through his stomach” was coined after someone tried these pops. But hey, they work on everyone—kids, coworkers, even that picky aunt. Ready to become the MVP of dessert tables? Grab your apron, and let’s get rolling!
Why You’ll Love This Recipe
- Effortless Elegance: No baking degree required! These pops use simple ingredients (hello, boxed cake mix hacks) but look like they came from a bakery.
- Budget-Friendly Bliss: Skip the $4-per-pop café prices. Homemade versions cost pennies and taste 10x better.
- Endless Customization: Dip them in white chocolate, sprinkle with gold dust, or drizzle with caramel—your creativity’s the limit!
How to Make Red Velvet Cake Pops
Quick Overview: Whip up bakery-worthy treats in 1 hour (plus chilling time) with minimal tools. The secret? Crumbled cake + cream cheese frosting = magic.
Key Ingredients (Serves 20-24 pops):
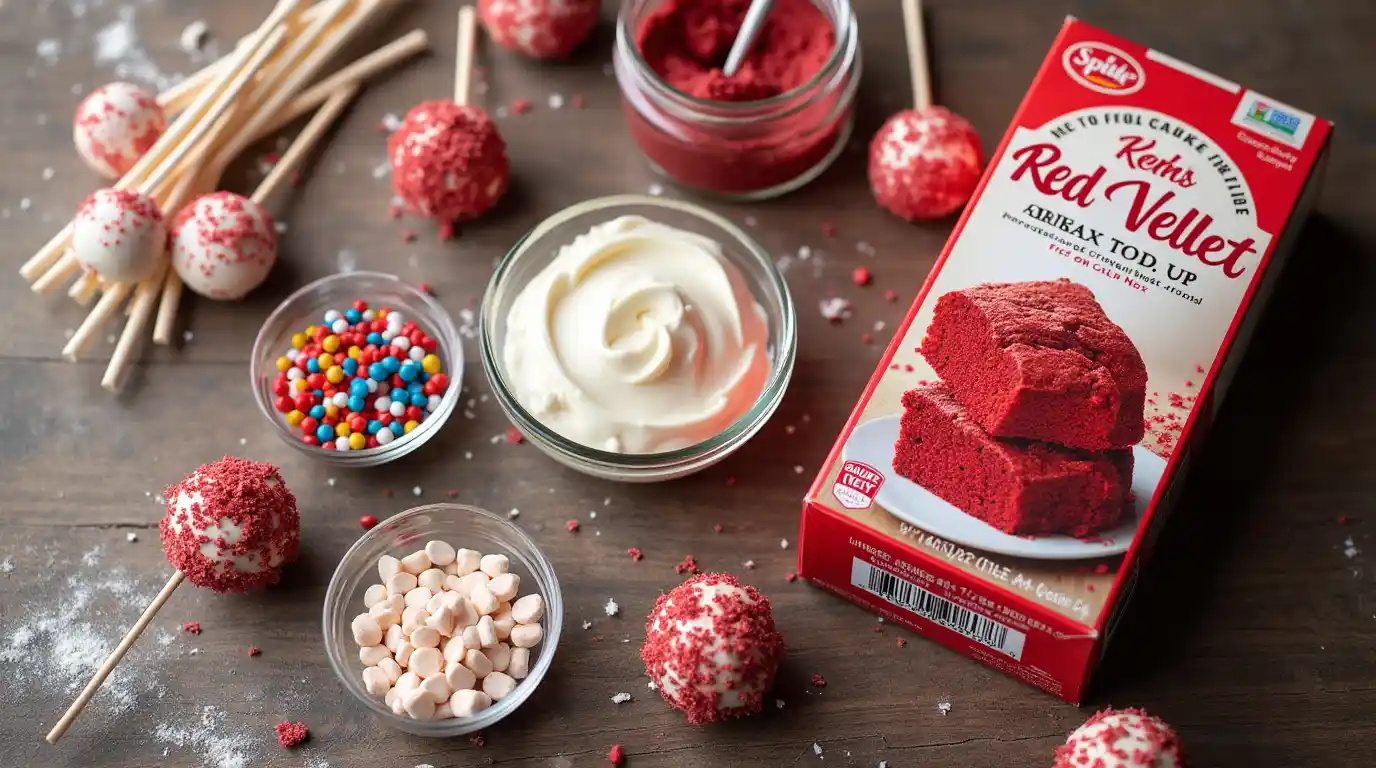
- 1 box red velvet cake mix .
- ½ cup cream cheese frosting (store-bought or homemade)
- 2 cups melting chocolate (white, dark, or milk)
- Lollipop sticks
- Sprinkles, crushed nuts, or edible glitter (optional)
How to Make Red Velvet Cake Pops: Step-by-Step Instructions
Step 1: Bake & Crumble
- Bake the Cake: Preheat your oven to 350°F (175°C). Prepare the red velvet cake mix according to the box instructions (typically requiring eggs, oil, and water). Pour the batter into a greased 9×13-inch pan and bake for 25–30 minutes, or until a toothpick inserted into the center comes out clean.
- Cool Completely: Let the cake cool in the pan for 10 minutes, then transfer it to a wire rack. Patience is key here! Warm cake crumbles unevenly and won’t bind properly.
- Crumble Like a Pro: Once cooled, break the cake into large chunks and use your hands or a fork to crumble it into fine, sand-like texture. Pro Tip: For faster results, pulse the cake in a stand mixer with the paddle attachment on low speed.
Step 2: Mix & Bind
- Add Frosting: In a large bowl, combine the crumbled cake with ½ cup cream cheese frosting. Start with ¼ cup, mix, then add more as needed. The mixture should hold together when squeezed—think “cookie dough” texture. Too dry? Add frosting 1 tbsp at a time. Too sticky? Chill the mixture for 10 minutes.
- Roll Uniform Balls: Use a small cookie scoop (1.5-inch) or your hands to portion the mixture into 20–24 balls. Roll them gently between your palms to smooth cracks. Pro Tip: Wear food-safe gloves to prevent red dye from staining your hands.
Step 3: Chill Out
- Freeze for Stability: Place the cake balls on a parchment-lined baking sheet and freeze for 15 minutes (or refrigerate for 30 minutes). This firms them up so they don’t fall apart during dipping. Don’t skip this! Cold cake balls = crack-free pops.
- Prep Sticks & Chocolate: While chilling, insert lollipop sticks into a foam block or upside-down colander to hold pops upright later. Melt 2 cups of chocolate wafers or candy melts in a deep, microwave-safe bowl (20-second bursts, stirring between each).
Step 4: Dip & Decorate
- Secure the Stick: Dip ½ inch of a lollipop stick into melted chocolate, then gently push it halfway into a cake ball. Let the chocolate set for 1–2 minutes—this “glues” the stick in place.
- Dip Like a Boss: Hold the pop by the stick and submerge the cake ball into the melted chocolate. Tilt the bowl and rotate the pop to coat evenly. Avoid swirling—it causes crumbs in the chocolate!
- Tap Off Excess: Lightly tap the stick against the bowl’s edge to remove extra chocolate. This prevents drips and ensures a smooth finish.
- Add Sprinkles Fast: Immediately sprinkle with toppings before the chocolate hardens (about 20 seconds!). For drizzles, let the base layer set first, then use a fork or piping bag.
Step 5: Set & Serve
- Dry Upright: Stick the pops into a foam block, upside-down box, or tall glass to dry. Let them set at room temperature for 1 hour, or speed things up with a 10-minute chill in the fridge.
- Fix Mistakes: If chocolate pools at the base, use a toothpick to gently scrape it away once semi-set. For cracks, dab on extra melted chocolate as “glue.”
Pro Tips for Flawless Cake Pops
- Avoid Temperature Shock: Let refrigerated cake balls sit at room temp for 5 minutes before dipping. Cold cake + hot chocolate = cracks!
- Thin Chocolate? Add 1 tsp coconut oil to melted chocolate for smoother dipping.
- No Candy Melts? Use chocolate chips + 1 tbsp shortening for a glossy finish.
- Keep Hands Cool: Dipping warm hands melt chocolate—work in batches and wash hands in cold water between rolls.
Time-Saving Hack: Bake the cake a day ahead! Store crumbled cake in an airtight container overnight, then mix with frosting the next day.
What to Serve With Red Velvet Cake Pops
Pair these pops with:
- Coffee or Milk: Balance sweetness with a bold espresso or cold glass of milk.
- Fruit Platters: Fresh berries add a tangy contrast.
- Savory Bites: Mini quiches or cheese boards keep the party balanced.
Top Tips for Perfecting Red Velvet Cake Pops
- Chill Like a Pro: Freeze cake balls for 15 minutes before dipping to avoid cracks.
- Chocolate Tempering: Microwave chocolate in 20-second bursts to prevent burning.
- No Sticks? No Problem: Use thick straws or pretzel rods for a rustic twist.
Storing and Reheating Tips
- Fridge: make it in an airtight container for up to 4 days.
- Freezer: Wrap pops in cling film and freeze for 2 months. Thaw overnight before serving.
- Revive Stale Pops: Microwave for 5 seconds to soften the chocolate.
Final Thoughts
Red velvet cake pops are more than just a dessert—they’re tiny, edible works of art that turn any occasion into a celebration. With just 5 steps and a dash of creativity, you’ve got a treat that’s as fun to make as it is to eat. Whether you’re prepping for a baby shower, holiday party, or a “just because” Tuesday, these pops promise smiles all around.
Still nervous about dipping? Don’t be! Even lopsided cake pops taste incredible (and hey, imperfections add charm). The key is to enjoy the process, lick the chocolate spoon, and embrace your inner pastry chef.
FAQs About Red Velvet Cake Pops
Got questions? I’ve got answers! Here are the most common queries (and fixes!) for perfect cake pops every time:
1. Can I use homemade cake instead of boxed mix?
Absolutely! Bake your favorite red velvet recipe, let it cool completely, then crumble it. Just ensure the texture is moist enough to bind with frosting—no dry crumbs allowed!
2. Why do my cake pops crack when dipping?
This usually happens if the cake balls are too cold or the chocolate is too hot. Let chilled cake balls sit at room temp for 5 minutes, and cool melted chocolate slightly before dipping.
3. How do I stop cake pops from sliding off the sticks?
Make the tip of each stick in melted chocolate. This acts as edible glue! Also, avoid overhandling the pops once dipped.
4. Can I make these vegan or gluten-free?
Yes! Swap the cake mix for a GF or vegan brand (like King Arthur or Duncan Hines), use dairy-free frosting, and opt for vegan chocolate.
5. How far in advance can I prepare them?
They’re perfect for prepping ahead! Store undipped cake balls in the fridge for 3 days or freeze for 1 month. Dip and decorate 1-2 days before serving.
6. No lollipop sticks? What can I use instead?
Get creative: Use paper straws, skewers, pretzel rods, or even forks for a quirky twist.

Red Velvet Cake Pops
Equipment
- 1x Mixing Bowl (for cake crumbles and frosting)
- 1x Baking Pan (for baking cake)
- 1x Electric Mixer (for mixing ingredients)
- 1x Microwave-safe Bowl (for melting chocolate)
- 24x Lollipop Sticks
Ingredients
- 1 box red velvet cake mix or homemade red velvet cake
- 3/4 cup cream cheese frosting
- 12 oz white or dark chocolate melting wafers
- 1 tbsp vegetable oil if needed, for thinning chocolate
- 24 lollipop sticks
- Sprinkles optional, for decoration
Instructions
- Bake the red velvet cake according to package instructions or homemade recipe. Let it cool completely.
- Crumble the cooled cake into fine crumbs in a large mixing bowl.
- Mix in the cream cheese frosting until the mixture is moldable.
- Roll the mixture into small, evenly sized balls (about 1 inch in diameter) and place them on a baking sheet lined with parchment paper.
- Chill in the refrigerator for at least 1 hour or in the freezer for 20 minutes.
- Melt the chocolate wafers in a microwave-safe bowl in 30-second intervals, stirring in between until smooth. Add vegetable oil if needed for a thinner consistency.
- Dip the tip of each lollipop stick into the melted chocolate and insert it halfway into a cake ball.
- Dip each cake ball into the melted chocolate, fully coating it. Let excess chocolate drip off.
- Place the coated cake pops upright into a foam block or parchment paper to set.
- While the coating is still wet, decorate with sprinkles if desired.
- Allow the cake pops to set completely before serving.
Video
Notes
– Store cake pops in an airtight container in the fridge for up to 5 days.
– Use candy melts in different colors for festive variations.